

Spring Boot Starter 接入
最近更新时间: 2026-06-30 15:06:00
操作场景
本文以调用 Spring Boot Starter SDK 为例介绍通过开源 SDK 实现消息收发的操作过程,帮助您更好地理解消息收发的完整过程。
前提条件
- 完成资源创建与准备
- 安装1.8或以上版本 JDK
- 安装2.5或以上版本 Maven
- 下载 Demo
操作步骤
步骤1:添加依赖
在 pom.xml 中添加依赖。
<!--rabbitmq-->
<dependency>
    <groupId>org.springframework.boot</groupId>
    <artifactId>spring-boot-starter-amqp</artifactId>
</dependency>
步骤2:准备配置
在配置文件中加入 RabbitMQ 配置信息(以 yaml 配置为例)。
spring:
  rabbitmq:
      # host地址可在控制台中获取 或 使用Rabbitmq服务地址
    host: amqp-xx.rabbitmq.x.xxxxtdmq.com
    port: 5672
    # 要使用的角色名称 可在角色管理控制台获取
    username: admin
    # 角色密钥
    password: eyJrZXlJZ....
    # Vhost全称,可在集群控制台Vhost tab页获取
    virtual-host: amqp-xxx|Vhost
参数 说明 host 集群接入地址,在集群基本信息页面的客户端接入模块获取。 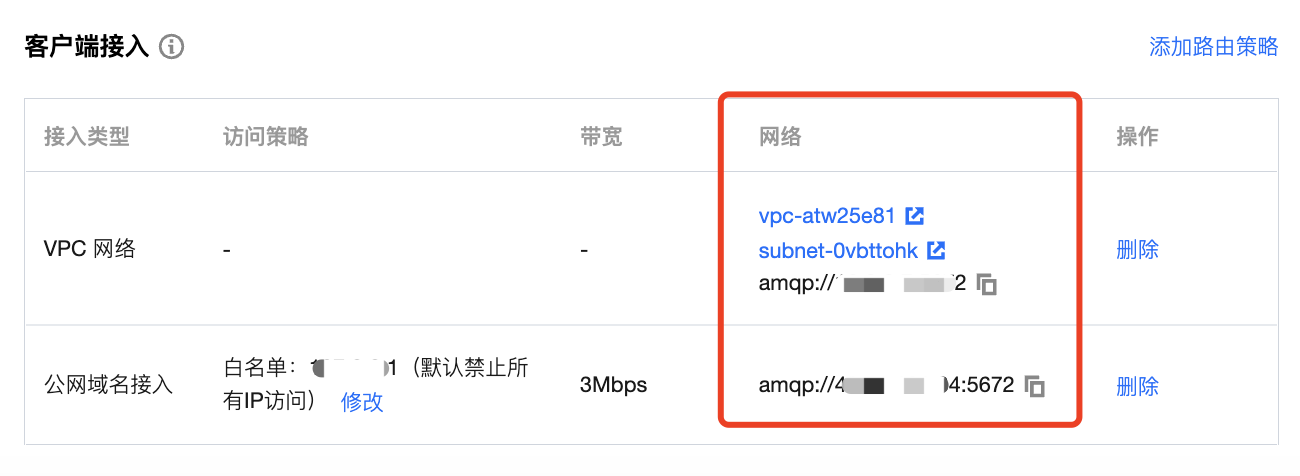
port 集群接入地址端口,在集群基本信息页面的客户端接入模块获取。 username 用户名称,填写在控制台创建的用户名称。 password 用户密码,填写在控制台创建用户时填写的密码。 virtual-host Vhost 名称,在控制台 Vhost 列表获取。 创建配置文件加载程序(以
Fanout交换机为例)。说明
其他类型的交换机配置可参见具体 Demo 示例。
/**
 * Fanout交换机配置
 */
@Configuration
public class FanoutRabbitConfig {

    /**
     * 交换机
     */
    @Bean
    public FanoutExchange fanoutExchange() {
        return new FanoutExchange("fanout-logs", true, false);
    }


    /**
     * 消息队列
     */
    @Bean
    public Queue fanoutQueueA() {
        return new Queue("ps_queue", true);
    }

    @Bean
    public Queue fanoutQueueB() {
        // 可通过这种方式绑定死信队列
        Map<String, Object> requestParam = new HashMap<>();
        requestParam.put("x-dead-letter-exchange", "my-deadLetter-exchange");
        // 设置消息过期时长
        requestParam.put("x-message-ttl", 60000);
        return new Queue("ps_queue1", true, false,true, requestParam);
    }

    /**
     * 绑定消息队列与交换机
     */
    @Bean
    public Binding bindingFanoutA() {
        return BindingBuilder.bind(fanoutQueueA())
                .to(fanoutExchange());
    }

    @Bean
    public Binding bindingFanoutB() {
        return BindingBuilder.bind(fanoutQueueB())
                .to(fanoutExchange());
    }
}
参数 说明 fanout-logs 绑定的 Exchange 名称,在控制台 Exchange 列表获取。 ps_queue 与 Exchange 绑定的第一个 Queue名称,在控制台 Queue 列表获取。 my-deadLetter-exchange 死信 Exchange 名称,在控制台 Exchange 列表获取。 ps_queue1 与 Exchange 绑定的第二个 Queue 名称,在控制台 Queue 列表获取。
步骤3:发送消息
创建并编译消息发送程序 DemoApplication.java,使用 RabbitTemplate 发送即可。
@Autowired
private RabbitTemplate rabbitTemplate;

public String send() {
    String msg = "This is a new message.";
    // 发送消息
    // 参数说明:参数1:交换机名称,在控制台 Exchange 列表获取。  参数2:routing key  参数3:消息内容
    rabbitTemplate.convertAndSend("direct_logs", "", msg);
    return "success";
}
步骤4:消费消息
创建并编译消息接收程序 FanoutReceiver.java。(以Fanout交换机为例。)
@Component
public class FanoutReceiver {
 // 注册一个listener监听指定消息队列
 @RabbitHandler
 @RabbitListener(queues = "ps_queue")  //与 Exchange 绑定的 Queue名称,在控制台 Queue 列表获取。
 public void listenerPsQueue(String msg) {
     // 业务处理...
     System.out.println("(ps_queue) receiver message. [" + msg + "]");
 }
}
步骤5:查看消息
如果您想确认消息是否成功发送至 TDMQ RabbitMQ 版,可以在控制台 集群管理 > Queue 的基本信息页面查看接入的消费者情况。
说明
其他使用示例请参见 Spring AMQP 官网。