

Spring Cloud Stream 接入
最近更新时间: 2026-06-30 15:06:00
操作场景
本文以调用 Spring Cloud Stream SDK 为例介绍通过开源 SDK 实现消息收发的操作过程,帮助您更好地理解消息收发的完整过程。
前提条件
- 完成资源创建与准备
- 安装1.8或以上版本 JDK
- 安装2.5或以上版本 Maven
- 下载 Demo
操作步骤
步骤1:添加依赖
在 pom.xml 中添加Stream RabbitMQ相关依赖。
<dependency>
    <groupId>org.springframework.cloud</groupId>
    <artifactId>spring-cloud-starter-stream-rabbit</artifactId>
</dependency>
步骤2:准备配置
在配置文件中进行相应配置 (以
direct交换机配置为例)。spring: application: name: application-name cloud: stream: rabbit: bindings: # 输出channel名称 output: # 生产者配置信息 producer: # 生产者使用的交换机类型 如果已存在交换机名称,该类型必须与交换机类型一致 exchangeType: direct # 用于指定 routing key 表达式 routing-key-expression: headers["routeTo"] # 该值表示使用头信息的routeTo字段作为 routing key queueNameGroupOnly: true # 输入channel名称 input: # 消费者配置信息 consumer: # 消费者使用的交换机类型 如果已存在交换机名称,该类型必须与交换机类型一致 exchangeType: direct # 消费者消息队列绑定的 routing key bindingRoutingKey: info,waring,error # 该配置会对上面的 routing key 进行处理 bindingRoutingKeyDelimiter: "," # 该配置表示:使用,切割上面配置的routing key # 消息确认模式 具体查看AcknowledgeMode acknowledge-mode: manual queueNameGroupOnly: true bindings: # 输出channel名称 output: #通道的名称 destination: direct_logs #要使用的exchange名称 content-type: application/json default-binder: dev-rabbit # 输入channel名称 input: #通道的名称 destination: direct_logs #要使用的exchange名称 content-type: application/json default-binder: dev-rabbit group: route_queue1 # 要使用的消息队列名称 binders: dev-rabbit: type: rabbit environment: spring: rabbitmq: host: amqp-xxx.rabbitmq.xxx.xxxxtdmq.com #集群接入地址,在集群管理页面操作列的获取接入地址获取。 port: 5672 username: admin #角色名称 password: password #角色密钥 virtual-host: vhostnanme #Vhost名称参数 说明 bindingRoutingKey 消费者消息队列绑定的 routing key,消息的路由规则,在控制台绑定关系列表的绑定 Key列获取。 
direct_log Exchange 名称,在控制台 Exchange 列表获取。 route_queue1 Queue名称,在控制台 Queue 列表获取。 host 集群接入地址,集群接入地址,在集群基本信息页面的客户端接入模块获取。 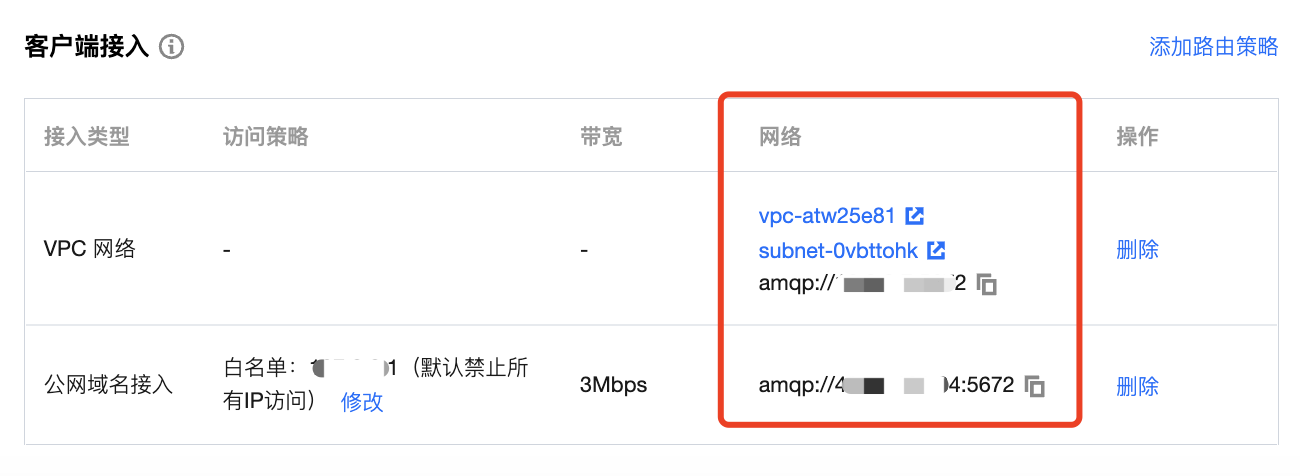
port 集群接入地址端口,在集群管理页面操作列的获取接入地址获取。 username 用户名称,填写在控制台创建的用户名称。 password 用户密码,填写在控制台创建用户时填写的密码。 virtual-host Vhost 名称,在控制台 Vhost 列表获取。 创建配置文件加载程序。
OutputMessageBinding.java
   public interface OutputMessageBinding {
     /**
        * 要使用的通道名称(输出channel名称)
        */
     String OUTPUT = "output";

     @Output(OUTPUT)
     MessageChannel output();
   }
InputMessageBinding.java
   public interface InputMessageBinding {

     /**
        * 要使用的通道名称
        */
     String INPUT = "input";

     @Input(INPUT)
     SubscribableChannel input();
   }
步骤3:发送消息
创建并编译消息发送程序 IMessageSendProvider.java。
// 引入配置类
@EnableBinding(OutputMessageBinding.class)
public class MessageSendProvider {

    @Autowired
    private OutputMessageBinding outputMessageBinding;

    public String sendToDirect() {
        outputMessageBinding.output().send(MessageBuilder.withPayload("[info] This is a new message.[" + System.currentTimeMillis() + "]").setHeader("routeTo", "info").build());
        outputMessageBinding.output().send(MessageBuilder.withPayload("[waring] This is a new waring message.[" + System.currentTimeMillis() + "]").setHeader("routeTo", "waring").build());
        outputMessageBinding.output().send(MessageBuilder.withPayload("[error] This is a new error message.[" + System.currentTimeMillis() + "]").setHeader("routeTo", "error").build());
        return "success";
    }

    public String sendToFanout() {
        for (int i = 0; i < 3; i++) {
            outputMessageBinding.output().send(MessageBuilder.withPayload("This is a new message" + i).build());
        }
        return "success";
    }
}
在要发送消息的类中注入MessageSendProvider 即可进行发送消息。
步骤4:消费消息
创建并编译消息消费程序 MessageConsumer.java。可配置多个通道,可对不同消息队列的监听。
@Service
@EnableBinding(InputMessageBinding.class)
public class MessageConsumer {

    @StreamListener(InputMessageBinding.INPUT)
    public void test(Message<String> message) throws IOException {
        Channel channel = (com.rabbitmq.client.Channel) message.getHeaders().get(AmqpHeaders.CHANNEL);
        Long deliveryTag = (Long) message.getHeaders().get(AmqpHeaders.DELIVERY_TAG);
        channel.basicAck(deliveryTag, false);
        String payload = message.getPayload();
        System.out.println(payload);
    }
}
步骤5:查看消息
如果您想确认消息是否成功发送至 TDMQ RabbitMQ 版,可以在控制台 集群管理 > Queue 基本信息页面查看接入的消费者情况。
说明
上述是基于 RabbitMQ 的发布订阅模型的一个简单示例,可根据实际使用进行不同配置,具体可参见 Demo 示例 或 Spring cloud stream 官网。